- WELCOME
-
MEDT 7490
- Assignment 1: Creating meaning with images
- Assignment 2: Coding and Decoding
- Assignment 3: Comics/Cartoons/GraphicNovels
- Assignment 4: infographics, posters
- Assignment 5: Redesign of instructional materials
- Assignment 6: Analysis of video commercials
- Assignment 7: Research on visual and media literacy
- Assignment 8: Comprehensive instructional design plan
- Final thoughts
- MEDT 7464
- MEDT 7485
- Portfolio
Assignment 8: Comprehensive Instructional Design Plan
PROPOSED ARTIFACTS: (artifacts 2 & 3 at bottom of page)
1. Homophone Prezi to introduce and review homophones
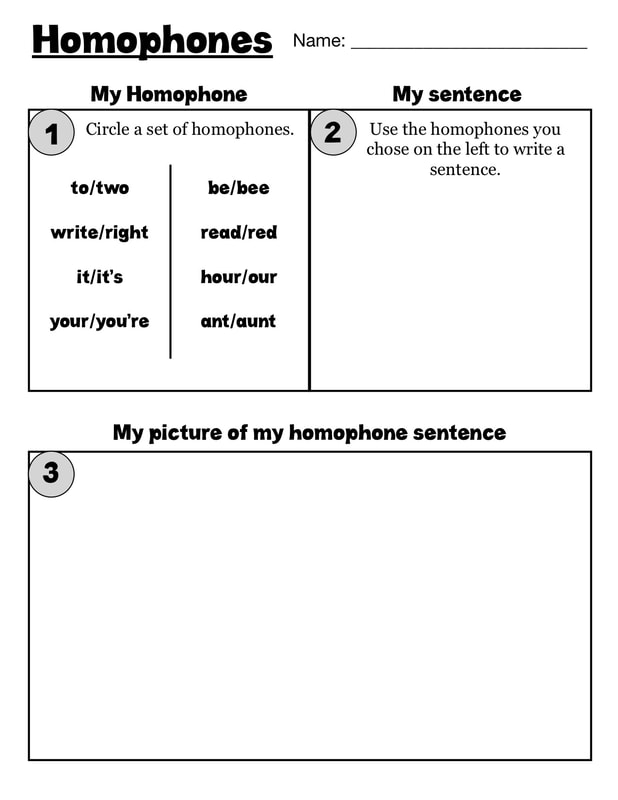
2. Homophone worksheet to completed by student
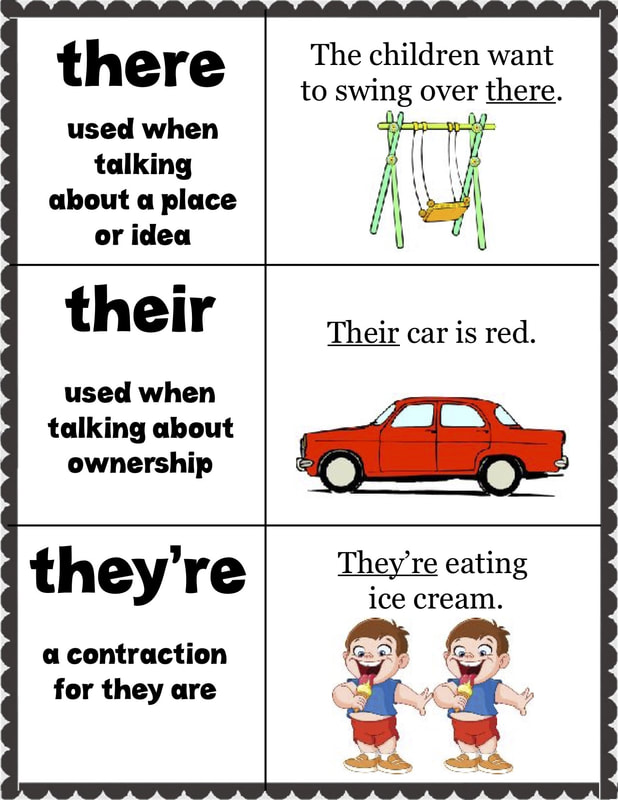
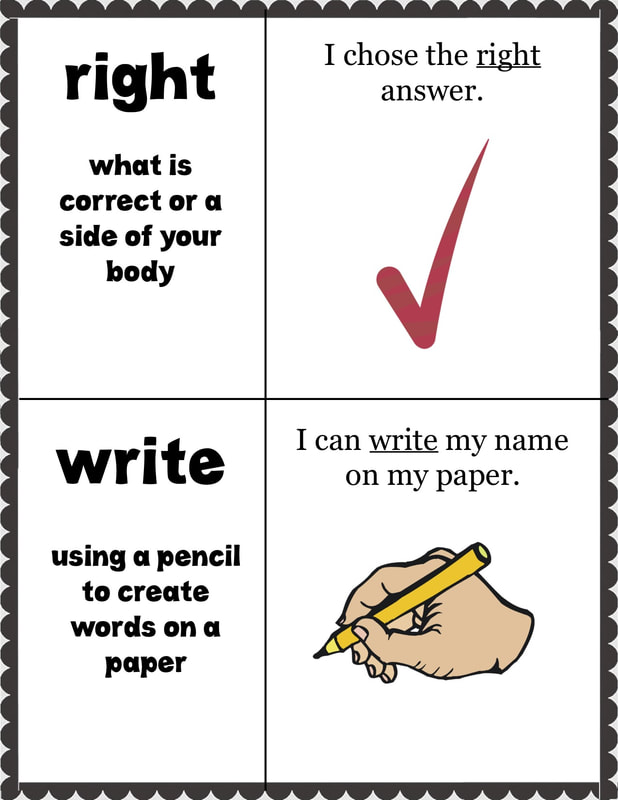
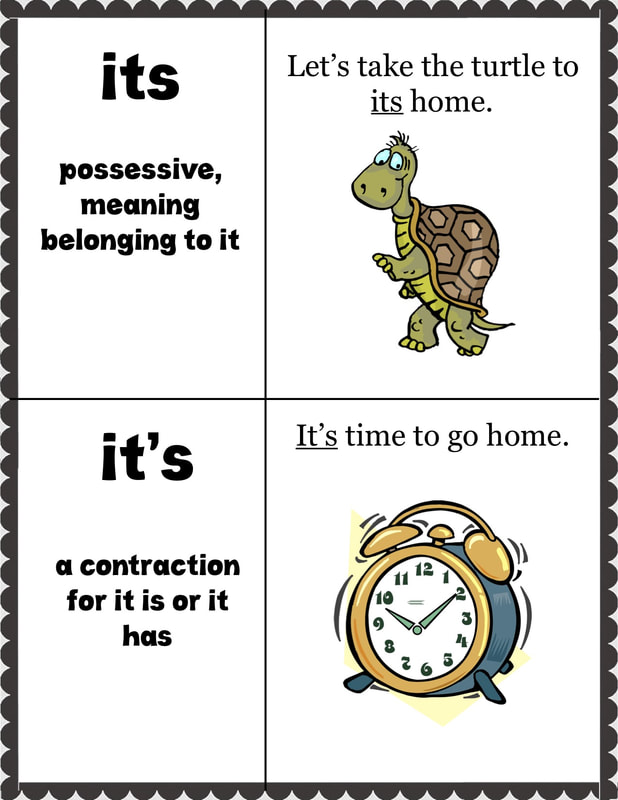
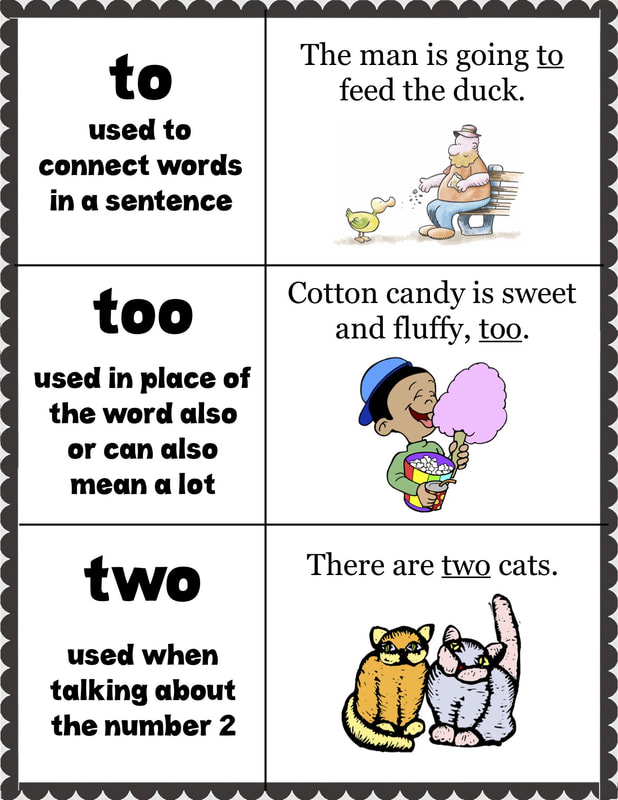
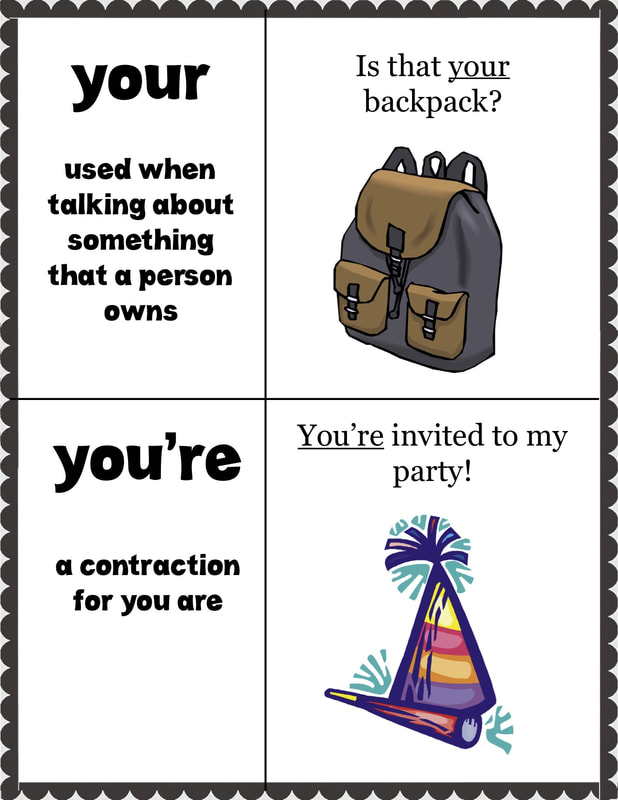
3. Homophone posters to be used in the classroom
Prezi link: https://prezi.com/view/60AvUzC3uXnHsmVzXb3z/
** all images for the posters were taken from www.clipart.com through a subscription I have there. These images are all copyright free through that site.
CLIENT INFORMATION:
Name: Ansley Clarkson
Grade: Kindergarten
School: Wauka Mountain Elementary
Email: ansley.clarkson@hallco.org
Teacher ID: 427171
INSTRUCTIONAL PROBLEM:
Students are easily confused when learning about homophones (and even when reviewing in upper grades). Normally, the teacher will lecture about homophones and use a highlighter to give attention to words on the ‘word wall’ (where all vocabulary is displayed in the classroom room) that are homophones. After observations and test scores on the topic, Mrs. Clarkson was looking for a new way to teach these students about homophones and thought visual examples might be key to helping the text ‘stick’. Students need a visual means along with text to help them understand and easily locate the different meanings of the words.
INSTRUCTIONAL METHOD:
For this visual design plan, I used Backwards Design. This design requires three steps:
(1)Identify desired outcomes, (2) Determine appropriate criteria for evaluation student’s progress, and (3) Plan the instructional methodology and learning experience.
I chose this method due to the nature of the project and discussing the instructional problem with my client and then what possible solutions she would like to have implemented to solve the problem. (1) I began by analyzing her requests and identifying her desired outcomes. (2) Once that was completed, we discussed the appropriate criteria for evaluation on progress (this was done through the Prezi – Your turn – section as well as through the worksheet the student must complete on their own. (3) I planned the learning experience for the students (see re-designed lesson below) to introduce the topic as well as provide verbal review, and written review/assessment.
RE-DESIGNED LESSON
My lesson plan is for introducing, practicing and evaluating the use of homophones in a kindergarten classroom. The beginning of the lesson would start with the Prezi on homophones. This Prezi walks you through the definition of a homophone. It then takes you to a new screen where students see examples of homophones (like the posters) with definitions for each word as well as a sentence using the word and a picture. The Prezi then goes to the next screen where the student must choose from a word bank, the correct homophone to fill in the sentences. Once all slides have been completed, the teacher will then review homophones once more by pointing out the posters that have been added near the ‘word wall’. Once this is complete students will be given a worksheet to complete on their own. First, they must select a set of homophones from the word bank and circle them. Step two asks the student to use the homophone pair to write a sentence. Step three asks students to draw a picture that represents the homophone set (like they see in the posters).
METHOD TO ASSESS/EVALUATE THE LESSON
By using visual images as well as texts, student’s retention should be higher and more easily achieved. This lesson provides the teacher with the means to evaluate successfulness of the lesson verbally, with written answer, as well as by illustrating. The teacher will evaluate the lesson and its effectiveness as they work through the Prezi, where the student will provide verbal feedback by filling in the blank with the correct homophone. The teacher will also evaluate the student’s knowledge of homophones by having them complete the homophone worksheet. Here students must write about and illustrate a homophone. This worksheet gives actual data that can be analyzed on how much each student has learned and retained about homophones.
SUPPORTED EXPLANATION
This lesson was initially only text based. Information from Frey & Fisher (2008) state, “…the eyes are the most powerful information conduit to the brain… Nerve cells devoted to visual processing… account for about 30% of the brain’s cortex, compared to 8% for touch and 3% for hearing… humans process visuals an astounding 60,000 times faster than text” (p.7). That statistic shows the importance of imagery in learning and how much quicker and easier your brain can process a visual image. Dual-coding mixes visual images along with text. Frey and Fisher (2008) say, “The research suggesting that mixing words and images... is a great way to foster comprehension and memory skills is bountiful” (p.48). I think because this lesson was merely only text and lecture students had a hard time remembering what they had learned by only looking to the ‘word wall’ for help. Based on dual-coding principle, I think this lesson has become more accessible and helpful through visual, text and oral practice in the Prezi, written and illustrated on the worksheet, and visually in the posters put up in the classroom. This lesson now gives students many different options to learn about homophones.
Reference
Frey, N & Fisher, D. (2008). Teaching visual literacy using comic books, graphic novels,
anime, cartoons and more to develop comprehension and thinking skills.California: Corwin Press.
ADDRESSING ACRL
This plan addresses several ACRL standards:
Standard One:
Standard Two:
2. The visually literate student conducts effective image searches.
b. Recognizes the role of textual information in providing access to image content, and identifies types of textual information and metadata typically associated with images (e.g., captions or other descriptions, personal or user-generated tags, creator information, repository names, title keywords, descriptions of visual content).
Standard One (1) deals with the overall instructional problem and the need for images to help with learning. (1)a. Students are able to see the purpose of the image and that it can help create understanding of the text it is associated with. Standard Two (2)b. The students can identify the role of textual information that is given about homophones that accompany the images on the posters and in the Prezi. Students can then use the worksheet to help them create descriptions of a homophone using words and images.
REFLECTION
This assignment was a really enjoyable one for me. I knew the perfect person to work with from my school. She is very motivated and was voted Teacher of the Year last year. One I faced during this project was initially figuring out what our instructional problem would be. Because she is so motivated, she had multiple ideas so narrowing it down was a small challenge, but a good one. Once that was narrowed down I began creating her artifacts. Finding images proved to be a little tricky at first, until I remembered my subscription to clipart.com which provides images that can be used copyright free. Once I showed the client the finished posters, she wanted to share the artifacts with the other ELA lead teachers in our school. Once this happened, one challenge was all of the feedback and corrections I received. While I appreciate the effort and want it to be perfect, it was a little challenging to have to go back and work on the artifacts multiple times to fix items each time someone found something new, but from my experience that is how life works when you have a client, many times I am on the other side of a plan and constantly giving feedback, so I appreciated it, but it was a challenge. Overall I had no major challenges in this project, visual artifacts are my niche, and even though it was a time consuming project it was one I thoroughly enjoyed!
PROPOSED ARTIFACTS: (artifacts 2 & 3 at bottom of page)
1. Homophone Prezi to introduce and review homophones
2. Homophone worksheet to completed by student
3. Homophone posters to be used in the classroom
Prezi link: https://prezi.com/view/60AvUzC3uXnHsmVzXb3z/
** all images for the posters were taken from www.clipart.com through a subscription I have there. These images are all copyright free through that site.
CLIENT INFORMATION:
Name: Ansley Clarkson
Grade: Kindergarten
School: Wauka Mountain Elementary
Email: ansley.clarkson@hallco.org
Teacher ID: 427171
INSTRUCTIONAL PROBLEM:
Students are easily confused when learning about homophones (and even when reviewing in upper grades). Normally, the teacher will lecture about homophones and use a highlighter to give attention to words on the ‘word wall’ (where all vocabulary is displayed in the classroom room) that are homophones. After observations and test scores on the topic, Mrs. Clarkson was looking for a new way to teach these students about homophones and thought visual examples might be key to helping the text ‘stick’. Students need a visual means along with text to help them understand and easily locate the different meanings of the words.
INSTRUCTIONAL METHOD:
For this visual design plan, I used Backwards Design. This design requires three steps:
(1)Identify desired outcomes, (2) Determine appropriate criteria for evaluation student’s progress, and (3) Plan the instructional methodology and learning experience.
I chose this method due to the nature of the project and discussing the instructional problem with my client and then what possible solutions she would like to have implemented to solve the problem. (1) I began by analyzing her requests and identifying her desired outcomes. (2) Once that was completed, we discussed the appropriate criteria for evaluation on progress (this was done through the Prezi – Your turn – section as well as through the worksheet the student must complete on their own. (3) I planned the learning experience for the students (see re-designed lesson below) to introduce the topic as well as provide verbal review, and written review/assessment.
RE-DESIGNED LESSON
My lesson plan is for introducing, practicing and evaluating the use of homophones in a kindergarten classroom. The beginning of the lesson would start with the Prezi on homophones. This Prezi walks you through the definition of a homophone. It then takes you to a new screen where students see examples of homophones (like the posters) with definitions for each word as well as a sentence using the word and a picture. The Prezi then goes to the next screen where the student must choose from a word bank, the correct homophone to fill in the sentences. Once all slides have been completed, the teacher will then review homophones once more by pointing out the posters that have been added near the ‘word wall’. Once this is complete students will be given a worksheet to complete on their own. First, they must select a set of homophones from the word bank and circle them. Step two asks the student to use the homophone pair to write a sentence. Step three asks students to draw a picture that represents the homophone set (like they see in the posters).
METHOD TO ASSESS/EVALUATE THE LESSON
By using visual images as well as texts, student’s retention should be higher and more easily achieved. This lesson provides the teacher with the means to evaluate successfulness of the lesson verbally, with written answer, as well as by illustrating. The teacher will evaluate the lesson and its effectiveness as they work through the Prezi, where the student will provide verbal feedback by filling in the blank with the correct homophone. The teacher will also evaluate the student’s knowledge of homophones by having them complete the homophone worksheet. Here students must write about and illustrate a homophone. This worksheet gives actual data that can be analyzed on how much each student has learned and retained about homophones.
SUPPORTED EXPLANATION
This lesson was initially only text based. Information from Frey & Fisher (2008) state, “…the eyes are the most powerful information conduit to the brain… Nerve cells devoted to visual processing… account for about 30% of the brain’s cortex, compared to 8% for touch and 3% for hearing… humans process visuals an astounding 60,000 times faster than text” (p.7). That statistic shows the importance of imagery in learning and how much quicker and easier your brain can process a visual image. Dual-coding mixes visual images along with text. Frey and Fisher (2008) say, “The research suggesting that mixing words and images... is a great way to foster comprehension and memory skills is bountiful” (p.48). I think because this lesson was merely only text and lecture students had a hard time remembering what they had learned by only looking to the ‘word wall’ for help. Based on dual-coding principle, I think this lesson has become more accessible and helpful through visual, text and oral practice in the Prezi, written and illustrated on the worksheet, and visually in the posters put up in the classroom. This lesson now gives students many different options to learn about homophones.
Reference
Frey, N & Fisher, D. (2008). Teaching visual literacy using comic books, graphic novels,
anime, cartoons and more to develop comprehension and thinking skills.California: Corwin Press.
ADDRESSING ACRL
This plan addresses several ACRL standards:
Standard One:
- The visually literate student defines and articulates the need for an image. a.Defines the purpose of the image within the project (e.g. illustration, evidence, primary source, focus of analysis, critique, commentary)
Standard Two:
2. The visually literate student conducts effective image searches.
b. Recognizes the role of textual information in providing access to image content, and identifies types of textual information and metadata typically associated with images (e.g., captions or other descriptions, personal or user-generated tags, creator information, repository names, title keywords, descriptions of visual content).
Standard One (1) deals with the overall instructional problem and the need for images to help with learning. (1)a. Students are able to see the purpose of the image and that it can help create understanding of the text it is associated with. Standard Two (2)b. The students can identify the role of textual information that is given about homophones that accompany the images on the posters and in the Prezi. Students can then use the worksheet to help them create descriptions of a homophone using words and images.
REFLECTION
This assignment was a really enjoyable one for me. I knew the perfect person to work with from my school. She is very motivated and was voted Teacher of the Year last year. One I faced during this project was initially figuring out what our instructional problem would be. Because she is so motivated, she had multiple ideas so narrowing it down was a small challenge, but a good one. Once that was narrowed down I began creating her artifacts. Finding images proved to be a little tricky at first, until I remembered my subscription to clipart.com which provides images that can be used copyright free. Once I showed the client the finished posters, she wanted to share the artifacts with the other ELA lead teachers in our school. Once this happened, one challenge was all of the feedback and corrections I received. While I appreciate the effort and want it to be perfect, it was a little challenging to have to go back and work on the artifacts multiple times to fix items each time someone found something new, but from my experience that is how life works when you have a client, many times I am on the other side of a plan and constantly giving feedback, so I appreciated it, but it was a challenge. Overall I had no major challenges in this project, visual artifacts are my niche, and even though it was a time consuming project it was one I thoroughly enjoyed!
ARTIFACT 2: Homophone Worksheet
ARTIFACT 3: Posters (used in classroom and in Prezi)
Proudly powered by Weebly
